woensdag 22 mei 2013

vrijdag 26 april 2013
Workshop Construction Management
Tijdens gastcolleges heb ik slechts enkele uren de tijd om construction management uit te leggen. Is er interesse voor een meer diepgaande, interactieve workshop ? Een vlugge berekening leert dat een workshop van 9.00h tot 17.00h incl broodjeslunch mogelijk is voor € 149 pp excl BTW bij 7 deelnemers.
Vriendelijke groeten,
Peggy
Vriendelijke groeten,
Peggy
woensdag 20 maart 2013
The ideal quantity take-off: how do they do it ?
The ideal quantity take-off provides information to the developer, the designer and the contractor.
How do they do it ?
The backbone of this QS are the objects the designer works with. From there you take sidetracks towards floor surface to gain knowledge for the developer and towards materials to come to the full shopping list for the contractor.
How detailed do you need to work ?
This depends on the phase: when you are only considering to invest, you will determine the cost on a much more global scale than when you're preparing the start of the works on site.
On www.bouwdata.net at the "download" page you find the Excel file with the Object Code in Dutch to start from.
In the left top corner you see 4 groups:
Why ?
Well, the designer works with models. When he removes a window, everything related to this particular window has to be cut out of the cost. And the designer doesn't want to look at ten places in the QS to do so.
On the other hand, when the contractor needs to put a price on a project, he doesn't want to look at ten places in the QS to find all the plasterwork, either.
So, what do we do ?
Well, the moment we start determining the materials, we add an extra column.
On www.bouwdata.net at the "download" page you find the Excel file with the Material Code in Dutch to work with. As explained in one of my first articles on this blog, I use the STABU standard instead of table 2 and 3 of the SfB.
You are used to a QS in a single tab of an Excel file.
To have an ideal QS for both the designer and the contractor, we are going to add an additional tab with the material code in the lead. Through the formula "sum.if", you can reorganise the QS you allready made into a shopping list for the contractor.
How ?
By moving forward to real construction cost engineering, and adding the cost type (labor, material, equipment or subcontractor) and a unique number (e.g. the article number of the supplier) to the material code. Once you have this, the "sum.if" formula turns this second tab into the complete shopping list for the contractor.
Now two partners have their ideal QS. What about the third one, the developer ?
He is interested in costs related to the big surfaces and in an analysis of the floor surface: gross floor space versus net floor space; salable floorspace versus net floor space.
When we look at the exemple of the window, the different levels of the object code will do.
In the tab of the material code, you enter a price per unit.
In the tab of the object code you add another column.
With the "vertical.search" formula you retrieve this price per unit from the tab with the material code.
In a next column in the tab of the object code, you multiply this price per unit with the quantity of the component (smallest particle of the object code). This gives you the total price per component.
E.g. the sum of all the components of 2D.31 divided by the total surface of all facade openings gives you a figure per square meter facade opening.
Store this in a database together with a solid project information sheet and the developer will get, over time, a good source for budgetting next projects.
But a developer needs more. On www.bouwdata.net at the "download" page you find the Excel file with the Development Code in Dutch to work with. This is a mixture of common sense, the Uniformat Classes and a variation on the coding of spaces in the Dutch Bouwbesluit.
Add this as a third tab to the QS.
I usually put this one first, then the tab with the Object Code, followed by the tab with the Material Code. Development is to be recognized by red-grey colours, Object by blue-grey colours and Material by green-grey colours.
When you go back to the Excel file concerning the Object Code you will see in the 4th column how this Object Code is related to the Development Code. By deviding the cost of the Object Code to the quantity of the, in column 4 mentioned, Development Code, you get e.g. the cost of the architectural and structural works per m² gross floor surface.
As a general rule I state that, with every item you want to measure, you ask yourself to which room this belongs (this is mainly the case with finishings and certain parts of the technical installation), which function it has (e.g. will it disappear when the window is removed from the model ? If so, put it onder 2D.31) and of which material it is made.
Whenever you work your way through the project in this methodological manner, you will certainly come to the ideal QS for the developer, the designer and contractor all at once.
But be aware: it remains a hideous job no matter whether you do it by a simple Excel file or by adding parameters in a BIM software.
Kind regards,
Peggy
How do they do it ?
The backbone of this QS are the objects the designer works with. From there you take sidetracks towards floor surface to gain knowledge for the developer and towards materials to come to the full shopping list for the contractor.
How detailed do you need to work ?
This depends on the phase: when you are only considering to invest, you will determine the cost on a much more global scale than when you're preparing the start of the works on site.
On www.bouwdata.net at the "download" page you find the Excel file with the Object Code in Dutch to start from.
In the left top corner you see 4 groups:
- group 1 is the structure of costs according to the investment standard NBN B06-003, the standard for costs related to facility management NBN B06-004 (both dark blue lines) and table 6 of the NEN 2634 (light blue lines) which connects the investment standard to table 1 of the international classification system SfB.
But for daily practice, this is too vague.
So we move to group 2 to get started.
- group 2 are the things you have to put a price on when you consider to invest.
According to the NEN 2634 one only needs to put figures behind the dark grey lines, the "element clusters", table 7 of this standard. But in order to make a proper decision between several options I dig deeper. The light grey lines - "elements" according to table 8 of the NEN 2634 - and white lines - "components" according to the BB-SfB (plus) - you see in group 2, are the checklist to follow. In the next phases (groups) more of them will appear.
- group 3 you use when you are working on a structural design.
This is often called the "provisional" design phase. But there is nothing provisional about it ! The moment you decided to go on with the investment, you started working on a layout plan, you determined where the loads will go to the foundations and where the technical shafts would come. I can't imagine that, once this job done, you consider to do it all over again because you changed your mind overnight. My advice: go slowly but steady forward in this phase and consult every teammember involved. This way you won't have to start all over again.
- group 4 you use when you are completing the design.
Why ?
Well, the designer works with models. When he removes a window, everything related to this particular window has to be cut out of the cost. And the designer doesn't want to look at ten places in the QS to do so.
On the other hand, when the contractor needs to put a price on a project, he doesn't want to look at ten places in the QS to find all the plasterwork, either.
So, what do we do ?
Well, the moment we start determining the materials, we add an extra column.
On www.bouwdata.net at the "download" page you find the Excel file with the Material Code in Dutch to work with. As explained in one of my first articles on this blog, I use the STABU standard instead of table 2 and 3 of the SfB.
You are used to a QS in a single tab of an Excel file.
To have an ideal QS for both the designer and the contractor, we are going to add an additional tab with the material code in the lead. Through the formula "sum.if", you can reorganise the QS you allready made into a shopping list for the contractor.
How ?
By moving forward to real construction cost engineering, and adding the cost type (labor, material, equipment or subcontractor) and a unique number (e.g. the article number of the supplier) to the material code. Once you have this, the "sum.if" formula turns this second tab into the complete shopping list for the contractor.
Now two partners have their ideal QS. What about the third one, the developer ?
He is interested in costs related to the big surfaces and in an analysis of the floor surface: gross floor space versus net floor space; salable floorspace versus net floor space.
When we look at the exemple of the window, the different levels of the object code will do.
In the tab of the material code, you enter a price per unit.
In the tab of the object code you add another column.
With the "vertical.search" formula you retrieve this price per unit from the tab with the material code.
In a next column in the tab of the object code, you multiply this price per unit with the quantity of the component (smallest particle of the object code). This gives you the total price per component.
E.g. the sum of all the components of 2D.31 divided by the total surface of all facade openings gives you a figure per square meter facade opening.
Store this in a database together with a solid project information sheet and the developer will get, over time, a good source for budgetting next projects.
But a developer needs more. On www.bouwdata.net at the "download" page you find the Excel file with the Development Code in Dutch to work with. This is a mixture of common sense, the Uniformat Classes and a variation on the coding of spaces in the Dutch Bouwbesluit.
Add this as a third tab to the QS.
I usually put this one first, then the tab with the Object Code, followed by the tab with the Material Code. Development is to be recognized by red-grey colours, Object by blue-grey colours and Material by green-grey colours.
When you go back to the Excel file concerning the Object Code you will see in the 4th column how this Object Code is related to the Development Code. By deviding the cost of the Object Code to the quantity of the, in column 4 mentioned, Development Code, you get e.g. the cost of the architectural and structural works per m² gross floor surface.
As a general rule I state that, with every item you want to measure, you ask yourself to which room this belongs (this is mainly the case with finishings and certain parts of the technical installation), which function it has (e.g. will it disappear when the window is removed from the model ? If so, put it onder 2D.31) and of which material it is made.
Whenever you work your way through the project in this methodological manner, you will certainly come to the ideal QS for the developer, the designer and contractor all at once.
But be aware: it remains a hideous job no matter whether you do it by a simple Excel file or by adding parameters in a BIM software.
Kind regards,
Peggy
zaterdag 2 maart 2013
Some thoughts on QS, BIM and renderings
The past two months I have been busy making old fashioned quantity take-offs based on plans in dwg format and figures to be put in an excel file.
The first project would be realised in a building team. So I could make sure that the quantity take-off would deliver knowledge for the developer, the designer and for the constructor. A hideous task but very rewarding.
The following projects were more old fashioned school: projects in a design-bid-build setting with the sole purpose of checking the bill of quantities and gaining no other knowledge whatsoever. The contractor made a bid based on the quantity take-off delivered by the architect and considered it to be presumably. But, as it often goes in private projects, the negotiations tend towards a total fixed price so the quantities presumed at first need to be checked.
That is where I pop in. The estimator is busy with his next "box" - cfr my first articles on this blog last year - and doesn't have the time to dig in the previous one. And another set of eyes detects other things. So they pay me to do the job.
The big difference with a decade ago is that there isn't any detailed quantity survey available to ease and shorten this time consuming control job. And skipping the control is no option because the rate of mistakes is no less than 10 years ago, quite on the contrary ...
Why ?
The first problem is the marketing motto of BIM software: it will shorten the time needed on the drawing table. What they don't mention is the vast amount of extra time needed to put all the parameters right in order to get the thorough quantity take off needed to finetune the estimation to its lowest price. The second problem is the lack of knowledge about estimation of the person who makes the drawings.
Let me give you an example: the walls in a bathroom of an apartment and judge for yourself.


Next question: how are we going to deal with this given the still existing "design-bid-build" culture and the possibilities new software has to offer ?
Here is my point of view.
The designer really sticks to his core business and chooses the software who gives the best rendering possibilities in the shortest possible time. His output reaches no further than a "moodboard" so that every participant in the building process can get the "look and feel" of the project.
Than the engineers have a look at it and determine the width of the construction needed for stability and the insulation needed for thermic and acoustic comfort desired by the client.
BIM is primarily a database and should also be threated this way. It contains solely information of the engineers and contractors. Nice rendering possibilities remain in the "moodboard" software.
Yes, this means drawing everything twice but the second pair of eyes allows you to detect errors and opens up good old fashioned communication - sometimes people, in business, tend to forget that we can also use our mouth for speech instead of our fingers.
There are two possible ways to create this BIM depending on the knowledge of the person making the model.
Kind regards,
Peggy
www.bouwdata.net
The first project would be realised in a building team. So I could make sure that the quantity take-off would deliver knowledge for the developer, the designer and for the constructor. A hideous task but very rewarding.
The following projects were more old fashioned school: projects in a design-bid-build setting with the sole purpose of checking the bill of quantities and gaining no other knowledge whatsoever. The contractor made a bid based on the quantity take-off delivered by the architect and considered it to be presumably. But, as it often goes in private projects, the negotiations tend towards a total fixed price so the quantities presumed at first need to be checked.
That is where I pop in. The estimator is busy with his next "box" - cfr my first articles on this blog last year - and doesn't have the time to dig in the previous one. And another set of eyes detects other things. So they pay me to do the job.
The big difference with a decade ago is that there isn't any detailed quantity survey available to ease and shorten this time consuming control job. And skipping the control is no option because the rate of mistakes is no less than 10 years ago, quite on the contrary ...
Why ?
The first problem is the marketing motto of BIM software: it will shorten the time needed on the drawing table. What they don't mention is the vast amount of extra time needed to put all the parameters right in order to get the thorough quantity take off needed to finetune the estimation to its lowest price. The second problem is the lack of knowledge about estimation of the person who makes the drawings.
Let me give you an example: the walls in a bathroom of an apartment and judge for yourself.


A lot of different situations for such a small room, isn't it ?
Next question: how are we going to deal with this given the still existing "design-bid-build" culture and the possibilities new software has to offer ?
Here is my point of view.
The designer really sticks to his core business and chooses the software who gives the best rendering possibilities in the shortest possible time. His output reaches no further than a "moodboard" so that every participant in the building process can get the "look and feel" of the project.
Than the engineers have a look at it and determine the width of the construction needed for stability and the insulation needed for thermic and acoustic comfort desired by the client.
BIM is primarily a database and should also be threated this way. It contains solely information of the engineers and contractors. Nice rendering possibilities remain in the "moodboard" software.
Yes, this means drawing everything twice but the second pair of eyes allows you to detect errors and opens up good old fashioned communication - sometimes people, in business, tend to forget that we can also use our mouth for speech instead of our fingers.
There are two possible ways to create this BIM depending on the knowledge of the person making the model.
- He/she knows how to estimate from a contractor's point of view. In this case everything of what is drawn in the example above is to be put into the model with the correct coding towards development, object and materials. A job as hideous as my excel file, believe me !
- He/she never worked as an estimator at a contractor company and therefore lacks the knowledge for thorough coding. In this case he/she makes sure that the parameters who generate the quantity take-off are left blank. This under the motto to put only these things into the model/database that are correct and generate knowledge for the other partners in the building process.
The person of situation 1 is currently a white raven and very hard to find. So most of the time we will be confronted with situation 2: a person who draws and is very familiar with BIM software and a person who estimates and hardly knows how to open a BIM file.
So, here is my advice when you choose a design-bid-build formula and work with BIM in the design phase:
- When you are not familiar with parameters in BIM, don't deliver the quantity take-off to the contractor. It only confuses him when he gets the wrong figures.
- Invite the contractor for a short briefing on how to use the BIM model in a BIM viewer software. Give him a locked BIM model to explore while estimating.
And remember: the purpose of BIM is not to save time but to eliminate errors by sharing a common tool. Only used at its best, it will ease the process. Carrelessly used it will generate extra failure and cost.
Kind regards,
Peggy
www.bouwdata.net
donderdag 14 februari 2013
Bouwteams en overheidsopdrachten: hoe zou dit werken ?
Dat is wat Dimitri De Cock probeert uit te zoeken.
Dimitri De Cock werkt bij de Dienst Infrastructuur en Vastgoed van de provincie Antwerpen en volgt daarnaast de opleiding Master in the Real Estate aan de Antwerp Management School.
Vorig jaar gaf ik er een gastcollege omtrent construction management en geraakten we aan de praat over bouwteams en overheidsopdrachten. Waarom gaat het daar nog moeizamer dan in de privé sector ? Hij wijdt er zijn masterproef aan.
Het zou hem - en mij ! - enorm helpen, mocht u enkele minuten vrij maken om de enquête in te vullen op https://www.enquetesmaken.com/s/95fda47
Van harte bedankt !
Vriendelijke groeten,
Peggy
Dimitri De Cock werkt bij de Dienst Infrastructuur en Vastgoed van de provincie Antwerpen en volgt daarnaast de opleiding Master in the Real Estate aan de Antwerp Management School.
Vorig jaar gaf ik er een gastcollege omtrent construction management en geraakten we aan de praat over bouwteams en overheidsopdrachten. Waarom gaat het daar nog moeizamer dan in de privé sector ? Hij wijdt er zijn masterproef aan.
Het zou hem - en mij ! - enorm helpen, mocht u enkele minuten vrij maken om de enquête in te vullen op https://www.enquetesmaken.com/s/95fda47
Van harte bedankt !
Vriendelijke groeten,
Peggy
vrijdag 21 december 2012
Merry Christmas and Happy New Year !
Dear readers,
it filled me with joy to see that my writings are appealing to readers all over the world: from Belgium to Malaysia and Brazil, from the US to Russia. I wish all of you a Merry Christmas and a Happy New Year !
Kind Regards,
Peggy
it filled me with joy to see that my writings are appealing to readers all over the world: from Belgium to Malaysia and Brazil, from the US to Russia. I wish all of you a Merry Christmas and a Happy New Year !
Kind Regards,
Peggy
woensdag 5 december 2012
Explaining BouwData - part 8
Long time since I found time to write something on this blog. I still don't have a lot of time but sometimes one just has to create some :o)
Anyway, concerning BouwData: so far I explained the way the contractor looks at an estimation (material code) and the way the designer does (object code). As stated in one of my earliest writings on this blog, there is also a third party who has an interest in estimating: the owner or developper. For them there is the development code.
What is important to developpers ? m² floorspace !
And moreover: how many square meters is needed for construction ? And of the net floor space which remains, how much of it can be sold to clients in case of apartments or how much can be used for e.g. beds in a hospital ?
Again I looked for standards to help me out. In Belgium and the Netherlands we have a standard on how to measure surfaces : NBN B06-002 which is equal to the NEN 2630. The latter one is already replaced by the NEN 2580 when they defined the "Bouwbesluit".
In Germany there is the DIN 277 and there is also an ISO 9836 available.
In 2011 the EN 15221-6 came to life but this is a standard for facility management. In the Netherlands a commission stated that this is an entirely different business, so they hold on to their NEN 2580. And in Belgium ... well, here it is business as usual: every organisation defines his own way of measuring :o)
What do I do ? The NBN B06-002 is quite simple and resembles a lot the NEN 2580, DIN 277 and ISO 9836. So I stick to that.
In this blog some practical guidelines in a nutshell.
Gross Floor Area
in Dutch: Bruto Vloeroppervlakte (BVO)
in DIN 277 indicated by BGF
 According to the NBN B06-002 you have to count the gross floor area on all levels. Thus also the levels partially or entirely underground, technical levels, roof terraces and attics where you can do something. You measure along the outer side of the facade on each floor just above the floor finishing.
Staircases, elevators and technical shafts, all belong to the BVO.
What doesn't belong to the BVO ?
Net Floor Area
in Dutch: Netto Vloeroppervlakte (NVO)
in DIN 277 indicated by NGF
Defined spaces and functions
In Belgium, every architect, creates names for the different spaces in a building. Sometimes he or she is consistent over all his/her projects, sometimes they like to invent names for every new project.
One could look at column 9 of table 0 of the SfB to define spaces but again, as with table 2 and 3 for the material code, I found the names in the Dutch "Bouwbesluit" more related to daily practice.
The DIN 277 roughly devides the net floor surface into:
Anyway, concerning BouwData: so far I explained the way the contractor looks at an estimation (material code) and the way the designer does (object code). As stated in one of my earliest writings on this blog, there is also a third party who has an interest in estimating: the owner or developper. For them there is the development code.
What is important to developpers ? m² floorspace !
And moreover: how many square meters is needed for construction ? And of the net floor space which remains, how much of it can be sold to clients in case of apartments or how much can be used for e.g. beds in a hospital ?
Again I looked for standards to help me out. In Belgium and the Netherlands we have a standard on how to measure surfaces : NBN B06-002 which is equal to the NEN 2630. The latter one is already replaced by the NEN 2580 when they defined the "Bouwbesluit".
In Germany there is the DIN 277 and there is also an ISO 9836 available.
In 2011 the EN 15221-6 came to life but this is a standard for facility management. In the Netherlands a commission stated that this is an entirely different business, so they hold on to their NEN 2580. And in Belgium ... well, here it is business as usual: every organisation defines his own way of measuring :o)
What do I do ? The NBN B06-002 is quite simple and resembles a lot the NEN 2580, DIN 277 and ISO 9836. So I stick to that.
In this blog some practical guidelines in a nutshell.
Gross Floor Area
in Dutch: Bruto Vloeroppervlakte (BVO)
in DIN 277 indicated by BGF
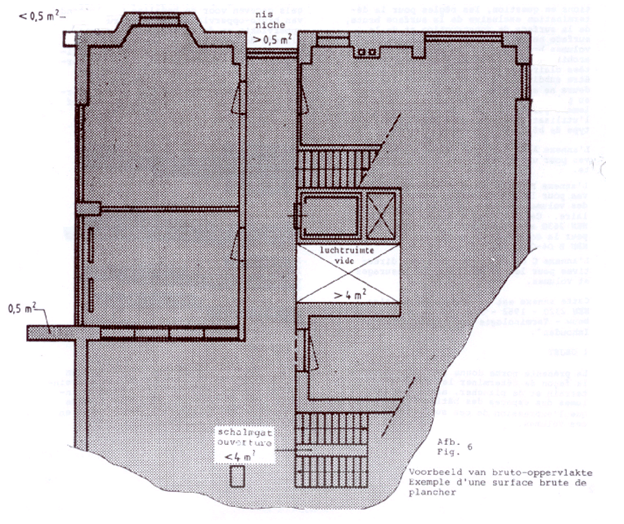
Staircases, elevators and technical shafts, all belong to the BVO.
What doesn't belong to the BVO ?
- smaller parts with a section < 0,5m² on the outside of the facade
- free standing columns outside the facade with a section < 0,5m²
- voides with a surface > 4m²
- basements with a free height < 1,50m
- roof surfaces who are not used as a terrace
- open staircases outside the building
- non covered area's such as patio's with a surface > 4m²
- metallic gangways along the facade with maintenance as its single purpose
This is the same as in the DIN 277.
In the ISO 9836 this is the "total floor area". This standard makes a distinction between spaces who are totally surrounded by walls and spaces who are partially open to the surrounding area. The NEN 2580 makes even a further distinction between covered outside spaces and non-covered outside spaces, both when adjacent to the building. We don't look at gardens or sitting areas which are detached from the building.
In the ISO 9836 this is the "total floor area". This standard makes a distinction between spaces who are totally surrounded by walls and spaces who are partially open to the surrounding area. The NEN 2580 makes even a further distinction between covered outside spaces and non-covered outside spaces, both when adjacent to the building. We don't look at gardens or sitting areas which are detached from the building.
Personally I make the distinction by adding an "e" to BVO for exterior when I measure terrraces and balconies and adding an "i" for interior when measuring entirely closed rooms/buildings.
When your building has a common wall with its neighbour, you measure to the heartline of it.
Net Floor Area
in Dutch: Netto Vloeroppervlakte (NVO)
in DIN 277 indicated by NGF
In short the net floor area is the gross floor area minus solid construction elements.
Following items are to be left out of the measurement:
- walls
when you take all the walls out of the measurement, you speak of net floor area
when you take only the bearing walls out, you speak of used floor area
in Dutch the latter one is called "gebruiksoppervlakte" and marked by GO - voides with a surface > 4m²
- parts of the room where the free height is < 1,5m
remark: in the DIN 277 these parts do belong to the net floor area - free standing column or a small wall when the groundsurface > 0,5m²
- shafts for technical ducts when the groundsurface > 0,5m²
Defined spaces and functions
In Belgium, every architect, creates names for the different spaces in a building. Sometimes he or she is consistent over all his/her projects, sometimes they like to invent names for every new project.
One could look at column 9 of table 0 of the SfB to define spaces but again, as with table 2 and 3 for the material code, I found the names in the Dutch "Bouwbesluit" more related to daily practice.
The DIN 277 roughly devides the net floor surface into:
- usefull surface
- technical spaces
- spaces for traffic
- rest surface (with the free height < 1,5m)
The Dutch "Bouwbesluit" is slightly different.
They defined following spaces:
1 toilet
2 bathroom
3 technical spaces
4 spaces for traffic
5 storage of bicycles
6 storage of garbage
7 elevator shafts
8 space used by people
9 undefined space (is the same as the "rest surface" of the DIN 277)
Next to defined spaces they have defined functions for the use of spaces:
1 living
2 meeting
3 captivity
4 health
5 industry
6 office
7 lodging
8 education
9 sports
10 shopping
11 other functions where people are not constantly present
Development Code
So, how do I glue this and other questions concerning floor surfaces together into one code ?
When I receive a plan in a design & build project, I first check the terrein surface. Believe it or not but it happened that a part of the building was designed on the ground of the neighbour !
The total terrain surface (TO) can be devided into categories and is to be marked on a plan:


They defined following spaces:
1 toilet
2 bathroom
3 technical spaces
4 spaces for traffic
5 storage of bicycles
6 storage of garbage
7 elevator shafts
8 space used by people
9 undefined space (is the same as the "rest surface" of the DIN 277)
Next to defined spaces they have defined functions for the use of spaces:
1 living
2 meeting
3 captivity
4 health
5 industry
6 office
7 lodging
8 education
9 sports
10 shopping
11 other functions where people are not constantly present
Development Code
So, how do I glue this and other questions concerning floor surfaces together into one code ?
When I receive a plan in a design & build project, I first check the terrein surface. Believe it or not but it happened that a part of the building was designed on the ground of the neighbour !
The total terrain surface (TO) can be devided into categories and is to be marked on a plan:
- surface to be build on (BTO - red), measured according the NBN B06-002
- surface to become a garden (ATO)
this garden can be part of the community (ATO_C - yellow) or privately sold to one of the owners of the complex (ATO_P - blue) - surface left as it is (OTO - not coloured)

The next thing I check is the gross floor area (BVO) with a distinction between inside (BVOi - green) and outside (BVOe - purple) according to the rules mentioned above.

Then we get to the inside: the net floor area (NVO).
Since the defined functions are only related to the defined space nr 8 "space where people remain", I use the code 8.01 for living, 8.02 for meeting, etc.
In the category 8.11 I make further distinctions:
Each room/function has again its own distinct color to use on plans. In this way I develop a visual "feeling":

For developers it is important to make a distinction between floor levels under the ground and floor levels above it. However, the standards don't give any answers when the soil isn't horizontal. The European Commission uses for his own buildings following method:

Level 0.00 on the outside of the facade is the level of the foothpad in the middel of the facade.
The floors who are situated between this outside level 0.00 and 1,50m below it, are considered "above groundlevel".
The Uniformat Classification uses A to mark the substructure en B to mark the superstructure and shell. In the development code I "borrow" this A and B.
Another important issue for developpers is to know the ratio between spaces used for the community and spaces to be sold to several owners. The first space I mark with a "C" and the latter with a "P".
An exemple of the Development Code: ACi8.11a
Kind regards,
Peggy
Since the defined functions are only related to the defined space nr 8 "space where people remain", I use the code 8.01 for living, 8.02 for meeting, etc.
In the category 8.11 I make further distinctions:
- 8.11a garage
- 8.11b storage
- 8.11c changing rooms
- 8.11z other functions
Each room/function has again its own distinct color to use on plans. In this way I develop a visual "feeling":

For developers it is important to make a distinction between floor levels under the ground and floor levels above it. However, the standards don't give any answers when the soil isn't horizontal. The European Commission uses for his own buildings following method:

Level 0.00 on the outside of the facade is the level of the foothpad in the middel of the facade.
The floors who are situated between this outside level 0.00 and 1,50m below it, are considered "above groundlevel".
The Uniformat Classification uses A to mark the substructure en B to mark the superstructure and shell. In the development code I "borrow" this A and B.
Another important issue for developpers is to know the ratio between spaces used for the community and spaces to be sold to several owners. The first space I mark with a "C" and the latter with a "P".
An exemple of the Development Code: ACi8.11a
- A : the space is to be found under groundlevel
B is above groundlevel
- C: the space is used by the whole community of owners
P is space exclusively for a private owner
- i: the space is completely surrounded by walls
e is outer space adjacent to the facade
- 8: space used by people
see above for the other defined spaces
- 11: other functions where people are not constantly present
see above for the other defined functions
- a: garage
Kind regards,
Peggy
Abonneren op:
Posts (Atom)